- Move the work to people instead of moving people to work. (India & China churns out more people and with appropriate skills - as compared to what can be accomplished in the Bay Area)
- Using contractor versus employees give flexibility in down sizing with no/little labor department intervention
- Take advantage of "follow the sun" development model
- Deal with labor laws
- No flexibility on pay day for employee. Contractors payment can be delayed with no/little impact
- Hiring/firing with little / no cost
- Avoid dealing with immigration related risks
- We had one Chinese company who was able to provide additional 3 resource for 2 week - with zero lead time for hiring/learning
- Less resource needed
- Office space
- User equipments (IT management)
I have my system partitioned into two: one part of the hard drive hosts a Windows XP partition, and the other runs Gentoo Linux. About a month ago, I was just about tired of having to reboot to switch between the two, so I decided to set up a VM for Windows.
There was, however, a snag to this: I wanted to use the existing Windows installation, because I'd tuned it up and installed the software I always use. I expressly didn't want a virtual disk image duplicating my Windows drive, since I didn't have the space for that. So, that was the task: running the Windows partition in a VM.
I hunted around the 'Net, and found surprisingly little information on this: the procedure I finally threw together was sourced from many disparate places. So, in one place, I've put together the steps you'll need to take in order to get a Windows partition running inside a VM.
What you'll need
You'll need a few tools in order to pull the information you need, and to run the finished VM:
- VMware Player:
- The easiest way to get a finished VM running; all you need to do is point the VM information file at
vmplayer, and you're good to go. - VMware kernel modules for Linux:
- All VMware products on Linux use kernel modules to get monitoring and networking functionality working, so you'll need those.
- A text editor:
- We'll be doing some hacking of configuration and VM information files, which means your favourite text editor.
- GNU Parted:
- In order for us to tell VMware about the hard disk, we need to know a few things about the disk; we'll also be doing a little hacking of the partition table. Parted allows us to do this from the command line, and quite easily too.
On a Gentoo Linux installation, you can get the software you need on the Linux side from the following command (on other distributions, check your associated documentation):
emerge vmware-player vmware-modules parted
Stage 1: Setting up a virtual hard disk
VMware needs a virtual disk descriptor file, telling it how the disk is set up and structured. So, dump the following into a file called
WindowsXP.vmdk:Disk description: WindowsXP.vmdk
# Disk DescriptorFile
version=1
CID=9428f535
parentCID=ffffffff
createType="fullDevice"
# Extent description
RW 63 FLAT "WindowsXP.mbr" 0
RW 23579072 FLAT "/dev/hda" 63
# The Disk Data Base
#DDB
ddb.toolsVersion = "6530"
ddb.adapterType = "ide"
ddb.virtualHWVersion = "4"
ddb.geometry.sectors = "63"
ddb.geometry.heads = "240"
ddb.geometry.cylinders = "1559"
The values highlighted in red are ones you'll need to change, depending on the characteristics of your hard disk: they describe my disk quite well.
Now you can fire up Parted against the disk you want to use. If you have Windows on one hard disk and Linux on another, use the Windows disk in the command below, otherwise just use the disk device containing the Windows partition.
Fetching disk information: Parted output
# parted /dev/hda
GNU Parted 1.7.1
Using /dev/hda
Welcome to GNU Parted! Type 'help' to view a list of commands.
(parted) unit s
(parted) print
Disk /dev/hda: 23579135s
Sector size (logical/physical): 512B/512B
Partition Table: msdos
Number Start End Size Type File system Flags
1 63s 9223199s 9223137s primary ntfs
2 9223200s 22679999s 13456800s primary ext3 boot
3 22680000s 23572079s 892080s primary linux-swap
(parted) unit cyl
(parted) print
Disk /dev/hda: 1559cyl
Sector size (logical/physical): 512B/512B
BIOS cylinder,head,sector geometry: 1559,240,63. Each cylinder is 7741kB.
Partition Table: msdos
Number Start End Size Type File system Flags
1 0cyl 609cyl 609cyl primary ntfs
2 610cyl 1499cyl 890cyl primary ext3 boot
3 1500cyl 1558cyl 59cyl primary linux-swap
Note the
unit s command, which tells Parted to print out its values in terms of disk sectors: we'll be using these values in the VMDK file. Also note the second unit command, to provide the values in cylinders; that allows us to fetch the disk geometry in CHS format.
The values in red are the ones we'll be using. But not so fast; before you plug the values in, we'll need to do some calculation. Instead of using the hard disk's standard boot sector, which allows you to boot Windows or Linux, we ideally want the VM to boot only Windows. We'll be doing that by telling the Windows partition to boot, ignoring the Linux boot menu, and then making a copy of that bootsector for the VM to use.
All that means we need two lines in the VMDK, as shown above: a line for the bootsector copy, starting at sector 0 and stretching for 63 sectors; and the rest of the hard disk, starting at sector 63. And that means a little calculation: the value in the VMDK for the size of the disk is 63 less than the actual disk.
Size of the virtual disk: Subtracting the MBR
23579135 - 63 = 23579072
Note that this is the value I've got in my VMDK, shown above.
I mentioned above that we'll be using a copy of the disk's bootsector for the VM, with Windows set to boot. We'll need to set that up first:
Setting Windows to boot: Parted output
(parted) set 1 boot on
(parted) print
Disk /dev/hda: 1559cyl
Sector size (logical/physical): 512B/512B
BIOS cylinder,head,sector geometry: 1559,240,63. Each cylinder is 7741kB.
Partition Table: msdos
Number Start End Size Type File system Flags
1 0cyl 609cyl 609cyl primary ntfs boot
2 610cyl 1499cyl 890cyl primary ext3
3 1500cyl 1558cyl 59cyl primary linux-swap
(parted) quit
#
Now to make a copy of the bootsector, using the infamous
dd utility:Copying the bootsector
# dd if=/dev/hda of=WindowsXP.mbr bs=512 count=63
63+0 sectors in
63+0 sectors out
#
Stage 2: The VMware information file
Once the VMDK is set up, we need to tell VMware what exactly it'll be booting, and which hardware to emulate. This is done by the information file, which in this case is
WindowsXP.vmx:The information file: WindowsXP.vmx
config.version = "8"
virtualHW.version = "4"
uuid.location = "56 4d 56 4a 7b d7 4c 30-f5 80 d6 8b c4 59 aa eb"
uuid.bios = "56 4d 56 4a 7b d7 4c 30-f5 80 d6 8b c4 59 aa eb"
uuid.action = "create"
checkpoint.vmState = ""
displayName = "Windows XP Professional"
annotation = ""
guestinfo.vmware.product.long = ""
guestinfo.vmware.product.url = ""
guestOS = "winxppro"
numvcpus = "1"
memsize = "128"
paevm = "FALSE"
sched.mem.pshare.enable = "TRUE"
MemAllowAutoScaleDown = "FALSE"
MemTrimRate = "-1"
nvram = "WindowsXP.nvram"
mks.enable3d = "FALSE"
vmmouse.present = "FALSE"
vmmouse.fileName = "auto detect"
tools.syncTime = "TRUE"
tools.remindinstall = "FALSE"
isolation.tools.hgfs.disable = "FALSE"
isolation.tools.dnd.disable = "FALSE"
isolation.tools.copy.enable = "TRUE"
isolation.tools.paste.enabled = "TRUE"
gui.restricted = "FALSE"
ethernet0.present = "TRUE"
ethernet0.connectionType = "nat"
ethernet0.addressType = "generated"
ethernet0.generatedAddress = "00:0c:29:59:aa:eb"
ethernet0.generatedAddressOffset = "0"
usb.present = "TRUE"
usb.generic.autoconnect = "TRUE"
sound.present = "TRUE"
sound.virtualdev = "sb16"
ide0:0.present = "TRUE"
ide0:0.fileName = "WindowsXP.vmdk"
ide0:0.mode = "independent-persistent"
ide0:0.deviceType = "rawDisk"
ide0:0.redo = ""
ide0:0.writeThrough = "FALSE"
ide0:0.startConnected = "TRUE"
ide1:0.present = "TRUE"
ide1:0.fileName = "/dev/cdrom"
ide1:0.deviceType = "atapi-cdrom"
ide1:0.writeThrough = "FALSE"
ide1:0.startConnected = "TRUE"
floppy0.present = "TRUE"
floppy0.fileName = "/dev/fd0"
floppy0.startConnected = "TRUE"
serial0.present = "FALSE"
serial1.present = "FALSE"
parallel0.present = "FALSE"
I've highlighted a couple of values which you might want to change: the location of the CD drive in the device tree, and the amount of memory you want to allocate to the VM.
Stage 3: Setting up Windows
We're not done yet; the Linux side of setting up the VM is running, but we now need to tell Windows that it'll be booting into a VM. The problem is rooted in the fact that the VM's hardware is different to your physical computer; thus, we need to add a hardware profile to the Windows partition.
We can also take this opportunity to test that the Windows partition boots up immediately, without a boot menu in the way. Reboot, and if the boot process doesn't run straight to Windows, you may need to tweak the partition boot settings and recreate the bootsector copy.
Once you're booted into Windows, pull open the System properties (Control Panel -> System, or My Computer (rightclick)-> Properties):
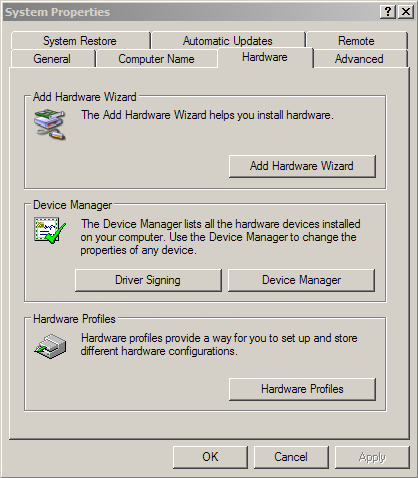
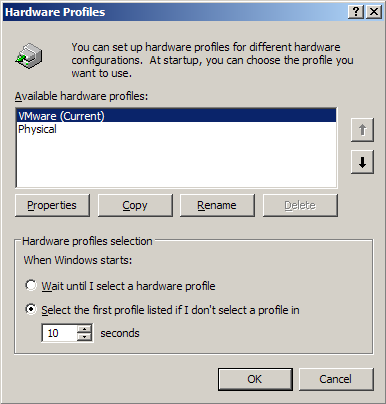
The default setup for this Hardware Profiles display is one profile, called "Default". Click on "Copy", to create a new profile, and call that one "VMware", then move it to the top of the list with the arrow buttons. You can see the settings I use in the image above, and we'll see exactly what that means for the Windows boot process in a little while.
While you have the System Properties open, pull open the Driver Signing properties, and set the value of what action Windows should take to "Ignore"; this allows any drivers to be installed automatically if devices are picked up by Windows.
This is also a good time to set up a helper script, which will install the VMware Tools: a set of drivers for the VMware emulated devices, and some services to help the Windows VM along. This could be done after the VM is set up and running, but I had issues with that, as detailed later. I've decided to put it here in stage 3, to catch the problem before it begins.
The VMware tools are provided by VMware as a CD ISO image, buried within the VMware Workstation software. It's relatively easy to find: first of all, download Workstation from VMware, or any Linux mirror (I've given a sample mirror below):
Once you've got the file, extract its contents (you may need third-party tools to do this in Windows), and look for a file called
windows.iso; this is the Tools CD image. If you feel like wasting a CD, burn the image to one, or you can mount the image as a drive using Daemon Tools or similar software.
When you can see the contents of the image, copy the files to your hard disk, in a directory called
C:\VMTools or something similar. Then dump the following into a .cmd file:VMware Tools install helper: C:\VMTools\ToolsHelper.cmd
if exist C:\VMTools\ToolsHelperLock.txt msiexec -i "C:\VMTools\VMware Tools.msi" /qn
if exist C:\VMTools\ToolsHelperLock.txt shutdown -r -f -t 30
del C:\VMTools\ToolsHelperLock.txt
Also, put a small message (any you like) into
ToolsHelperLock.txt in the same directory. The lock file will be used by the helper script to work out if it needs to reboot. Once you've done this, add the script to your Start Menu's Startup folder, and you'll be away.
Log yourself out of Windows and reboot; that should be the last time it needs to be started physically. Boot yourself into Linux; it's time to test this thing.
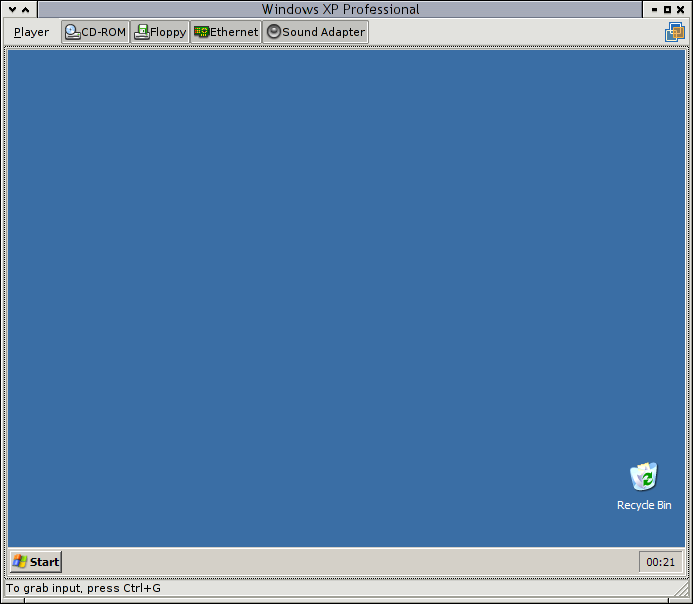
Stage 4: Virtual Windows
When you fire up the VM, it should now automatically pick up the Windows partition, and begin booting it. The presence of two hardware profiles means that Windows will ask which one you wish to use:

Pick the VMware profile, and Windows should boot, into a very minimal VGA-colour mode: it doesn't have the drivers for the "VMware SVGA" yet. At this point, the helper script should kick in, install the VMware tools, and then reboot the VM. Make sure to remove the helper script from your Startup folder upon the next reboot; even though it won't run, it'll still flash a Command-Prompt window up for a short while.
Snags: Getting the network running
I mentioned earlier that I had a problem with my keyboard and mouse not being detected by Windows in the VM, thus bringing about the helper script to allow the VMware tools to install the requisite drivers. I did have another issue with the VM, and that was getting it to talk to the outside world.
Initially, I set the VM's network card to a "bridged" type, allowing it to reside on the same network as the host machine; this usually works fine. In the case of a laptop with wireless, however, it didn't so much: no communication. After some experimentation, I resorted to the NAT method: one network that the host computer sits on, and another between the host and VM. This also involves a bit of
iptables trickery, so I'm putting it in as a part of this guide.
In my case, the normal wireless network resides on
192.168.1.0/24, so I decided to put the virtual network at 192.168.58.0/24. This means the host gets an address of 192.168.58.1 on the NAT network, and the VM's network connection gets a static IP of 192.168.58.2; it also means the following changes to the Linux host's configuration:Allowing IP forwarding: /etc/sysctl.conf
net.ipv4.ip_forward = 1
Initialising iptables NAT: /etc/conf.d/local.start
ifconfig ra0:1 192.168.1.252
iptables -t nat -A PREROUTING -i ra0 -d 192.168.1.252 -j DNAT --to-destination 192.168.58.2
iptables -t nat -A POSTROUTING -o ra0 -s 192.168.58.2 -j SNAT --to-source 192.168.1.252
iptables -A INPUT -i ra0 -d 192.168.1.252 -p tcp -j ACCEPT
iptables -A INPUT -i ra0 -d 192.168.1.252 -p udp -j ACCEPT
iptables -A INPUT -i ra0 -d 192.168.1.252 -p icmp -j ACCEPT
Note how the wireless interface
ra0 has had a virtual interface added, dedicated to the transfer of traffic for the virtual machine NAT. The particular configuration files you need to change may differ depending on the distribution; the changes above are from my Gentoo system.In the End: Windows in a VM
After all's said and done, you should have something like this:
Let me know if you get it working, or if you want to shout at me about something.
Snapshot from: http://imrannazar.com/Running-a-Windows-Partition-in-VMware